
 168
168
This Happens
- when the MICR information for the payment may have been misread;
- if the status displays Failed, it may indicate that an error has occurred.
IMPORTANT REMINDER: DO NOT HIT THE RESOLVE BUTTON UNLESS THE CHECK/MONEY ORDER IS RESCANNED SUCCESSFULLY.
Option 1: Review What is the Error Message
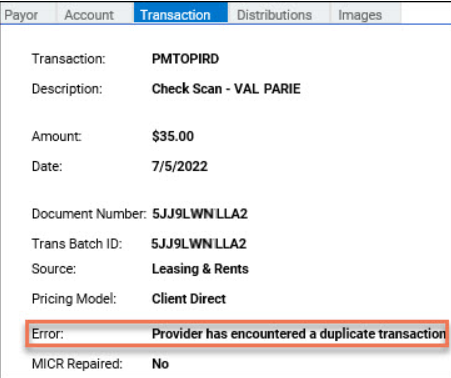
Step 1: Review the Error Message
1. Go to Navigation Menu > Payments > Bulk Processing
2. Click the Description column where the Requires Attention status is showing in the batch
3. Under the ItemAmount, click the Amount of the payment item in question
4. Click the Transaction tab to see the error message:
5. Click the Images tab and see if there are issues with the scanned image of the check
Option 2: Repair the MICR Line
This is to make sure that it will clear up or read the MICR line
Step 1: Re-scan the Check
Before attempting to repair the MICR line manually, rescan the item to see if this will read the MICR numbers properly. If this does not resolve the issue, proceed to Step 2: Repair MICR
Step 2: Repair MICR
The symbol on the Check

1. Click the MICR tab
2. Enter the correct MICR. Replace any question marks (?) with the appropriate numbers and symbols by comparing them to the actual check or scanned image.
3. Click Repair
4. Enter the amount and other required details
5. Click Upload
If Payment is a Money Order or Cashier's Check
Commonly, the document number is listed first in the MICR line for money orders or cashier's checks; you may re-order the MICR Line as follows:
1. After scanning the payment, replace the MICR line using the below format with "t" and "o" representing the symbols that separate the routing and account number. Enter the document number in the next line:
t<Routing Number>t space <Account Number>o <Check Number>
2. Click Repair
3. Click Upload
Mark the Payment in Question as Resolved
Once you recognize the error message and are able to fix the actual problem of the scanned payment, you can mark the payment as Resolved. This will remove the error message from the transaction but will not formally address any problems.
1. Go to the Navigation Menu > Payments > Bulk processing
2. Click the Batch under the Description column
3. Click Resolve

